Mocking OAuth2 Flows in Spring Boot with WireMock

OAuth2 is the most widely-deployed protocol for app authentication but presents a challenge when developing and testing the apps that use it.
- Many apps require the user to be logged in before they can take any meaningful action. This means that every test case or interactive development session must start with a login against the OAuth2 identity provider.
- This introduces an external dependency that can slow things down in a variety to ways. Often teams will connect their local/dev/test environment to a non-production tenant of whatever IdP they’re using for the live app, which can mean slow execution (particularly when running automated tests that require login), time-consuming test data setup, rate limiting and conflicts of data in shared tenants.
A better solution would be an IdP substitute that’s local, fast and doesn’t require much or any data management. Below we’ll show you a simple way to build exactly that type of solution using open source WireMock.
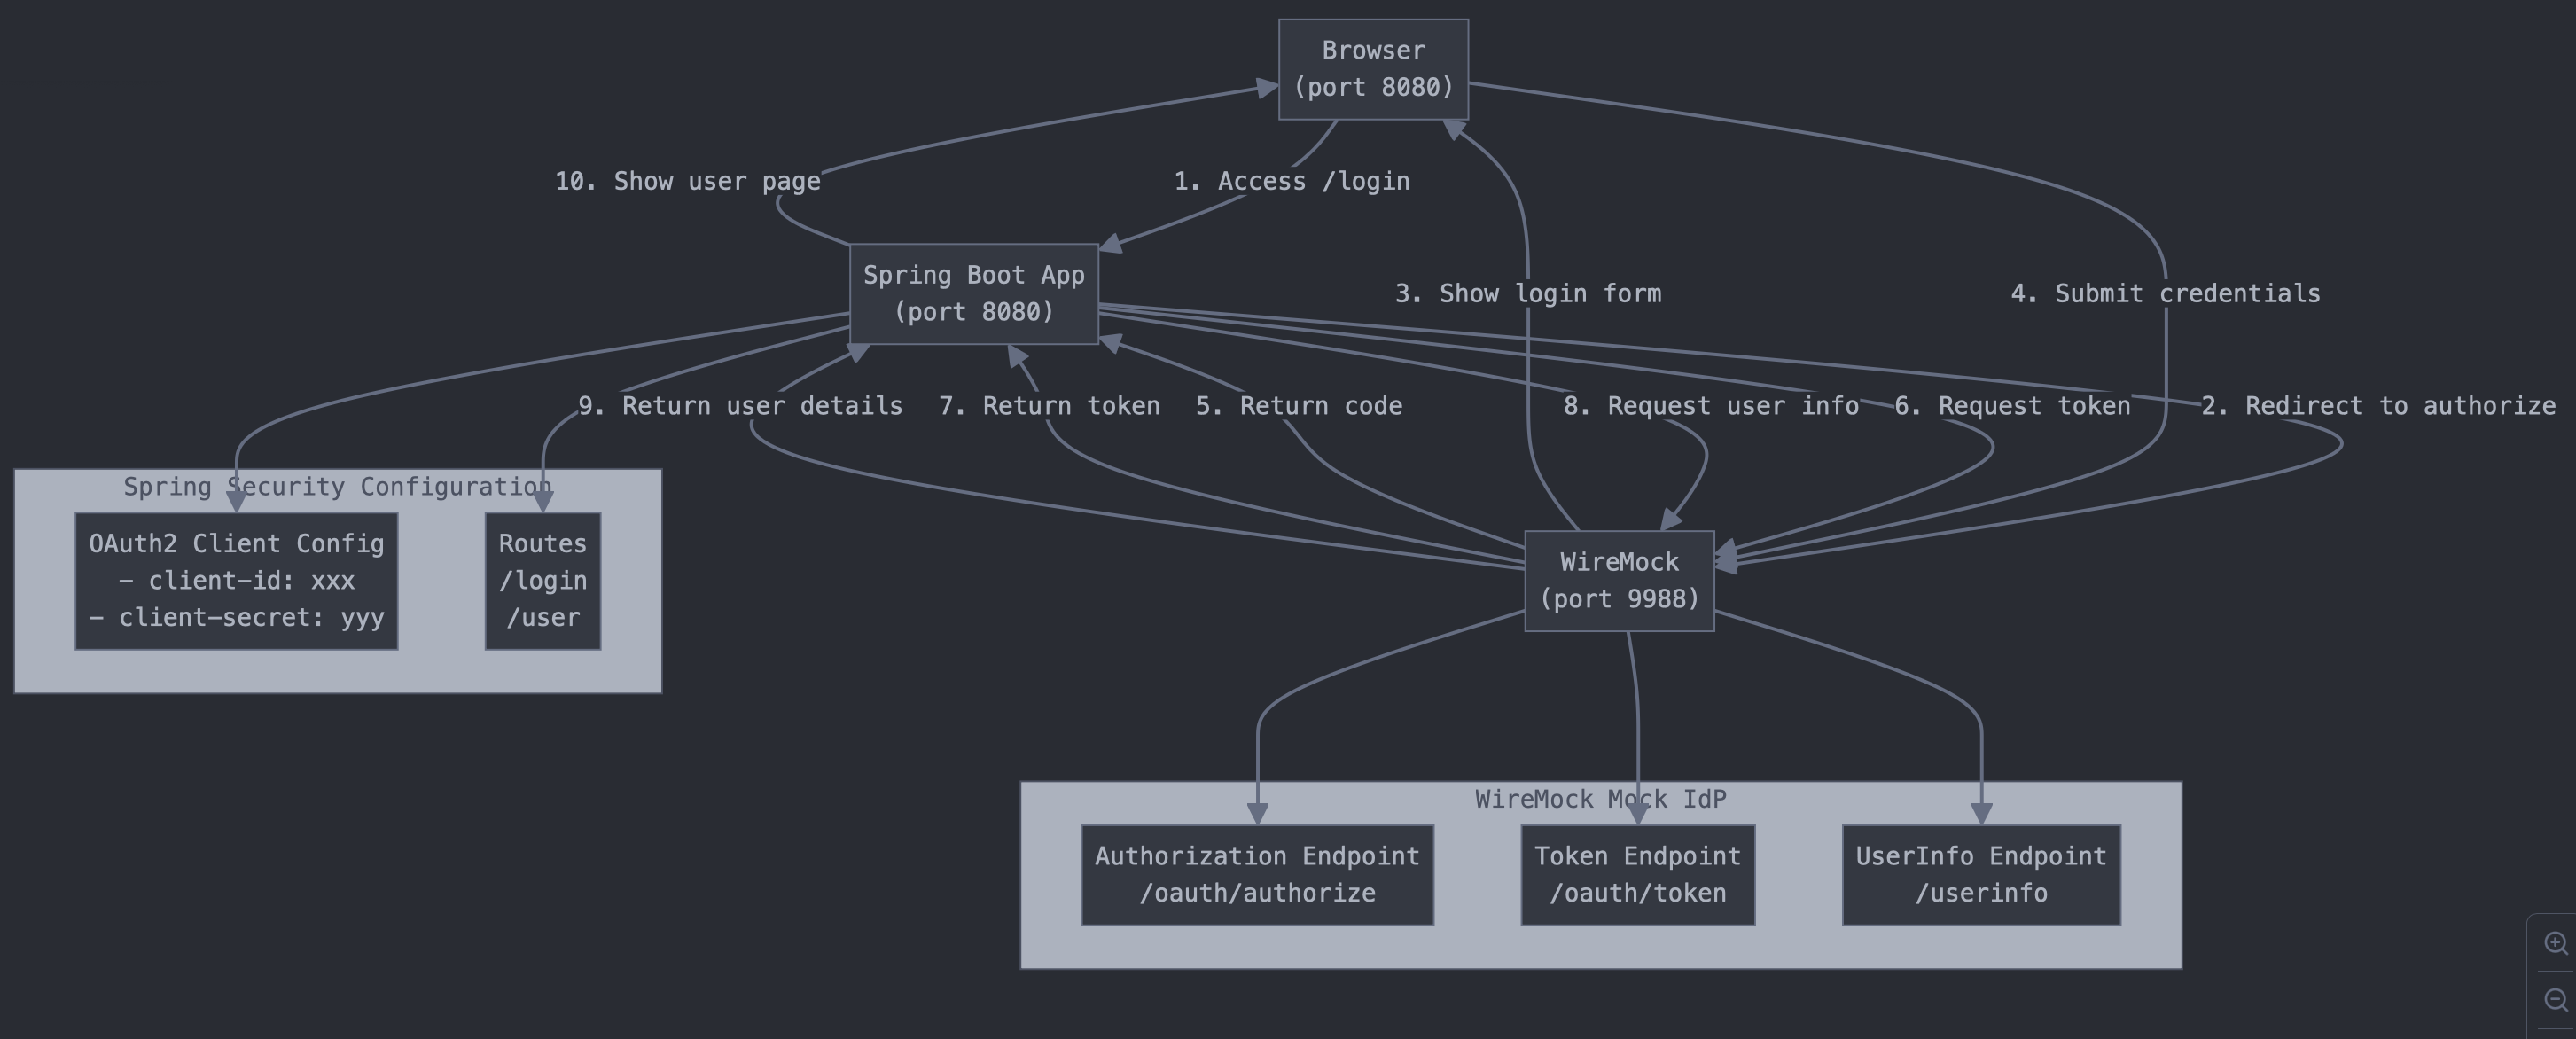
Solution Architecture

Simulating an OAuth2 IdP
WireMock is a general-purpose mocking tool intended to simulate a wide variety of API types. Using some of its more advanced dynamic mocking features it can simulate an OAuth2 identity provider, which can be used as a drop-in replacement for the real thing during development and testing.
Using a mock API will enable much faster login during dev and test, with minimal impact on the scope or accuracy of our API responses. And because our solution will use whatever user details are submitted in the login form, it won’t require the creation of any test data, which means:
- You don’t need to maintain a separate test user database or worry about data synchronization issues.
- Developers can create a one-off user for each test case, ensuring they’re starting from a pristine state.
Mocking your Spring Boot login provider
Spring Boot has a set of dedicated OAuth2 security modules that allow OAuth2 security to be added to your app with very little code. We’ll use these to set up a basic Spring Boot app with OAuth2 authentication enabled, while using a local WireMock instance in place of the production IdP.
For brevity we’ll focus on the key pieces of code and configuration, but if you want to see the fully-working finished product you can find this on GitHub.
If you’d like to integrate your app with a ready-made OAuth2 / OIDC mock that’s running in the cloud you can use the one hosted on WireMock Cloud.
Solution Implementation
Step 1: Create a new Spring Boot app
Let’s start with a standard Spring Boot application structure. We'll use Spring Initializr (https://start.spring.io) to scaffold our project with the essential dependencies:
Step 2: Configure the app to use Spring Security
Next, we'll configure Spring Security to require authentication for most endpoints while leaving the login-related paths publicly accessible:
Step 3: Create login and user info routes
We need 2 web routes: a page from which to initiate OAuth2 login and a user info page to show who we’re logged in as once we’ve successfully returned.
Step 4: Configure WireMock standalone
Copy the WireMock OAuth2 mock into the project. See https://github.com/wiremock/wiremock-spring-boot-oauth2-demo/tree/main/wiremock-oauth2
Step 5: Configure Spring Security to use WireMock
Now we'll configure Spring Security to use our local WireMock instance instead of a real OAuth2 provider. This is done through the application.yml configuration file:
Note that the WireMock mock doesn’t care about the values of the client ID or secret so dummy values are supplied.
The issuer-uri field is used by Spring to resolve the OIDC configuration endpoint at http://localhost:9988/.well-known/openid-configuration which provides all of the necessary config parameters for auth client to configure itself. This is less verbose than passing those parameters explicitly in the configuration file, and reduces duplication.
Step 6: Run the app and test
In one terminal start the OAuth2 mock:
In another terminal start the app:
Open http://localhost:8080/ in your browser and click the “Sign in” link to initiate a login against the mocked Idp.
After submitting the login form you should be returned to a user info page showing the email address you entered and a generated user ID.
Customizing the mock
User info endpoint
After login, Spring will call the user info endpoint (passing the access token fetched in the previous step for authentication) to fetch details about this user.
By default we return the user ID via the sub field and their email address, but this data can be customized by modifying the /userinfo stub, whose body data is defined in wiremock-oauth2/__files/userinfo.json.handlebars.
After some variable assignment this returns a fairly straightforwarded templated JSON object, which you can add or modify attributes to according to your requirements.
Note on JWT and OpenID Connect
The recently open-sourced JSON Web Tokens (JWT) extension for WireMock allows JWTs to be configured and created via a Handlebars template helper, and a supporting JSON Web Key Set (JWKS) to be output.
This means WireMock can simulate the behaviour of an OpenID Connect compliant identity provider, creating valid, signed JWT ID tokens that can be customised to mimic the specific behaviour of your IdP.
The mock referenced in this article is OIDC compliant, but the Spring Boot app is configured (per Spring’s defaults) to use the user info endpoint rather than the JWT ID token to retrieve user details.
Customizing the ID token
If your client app does consume the ID token for user data, you can customize its contents in a similar fashion to the user info endpoint.
This can be done quite straightforwardly by editing the file wiremock-oauth2/__files/token.json.handlebars.
The line of interest is
Which is the call to the Handlebars helper that produces the actual JWT token value. This helper takes a variety of parameters which are documented in full here https://docs.wiremock.io/response-templating/jwt but for example to modify the expiry interval I could add the maxAge parameter as follows:
Closing
This short tutorial has hopefully shown how a fast, fully local OAuth2 login setup is possible with your Spring Boot app, allowing you to spend less time waiting for external IdP servers to respond or debugging their configuration.
>> Connect with Tom on LinkedIn

/
Latest posts
Have More Questions?

.svg)
.svg)


.png)
.png)
.png)
